Learn the complete flooded basement cleanup and restoration process, from water removal and structural drying to flood cuts, drywall repair, and repainting.
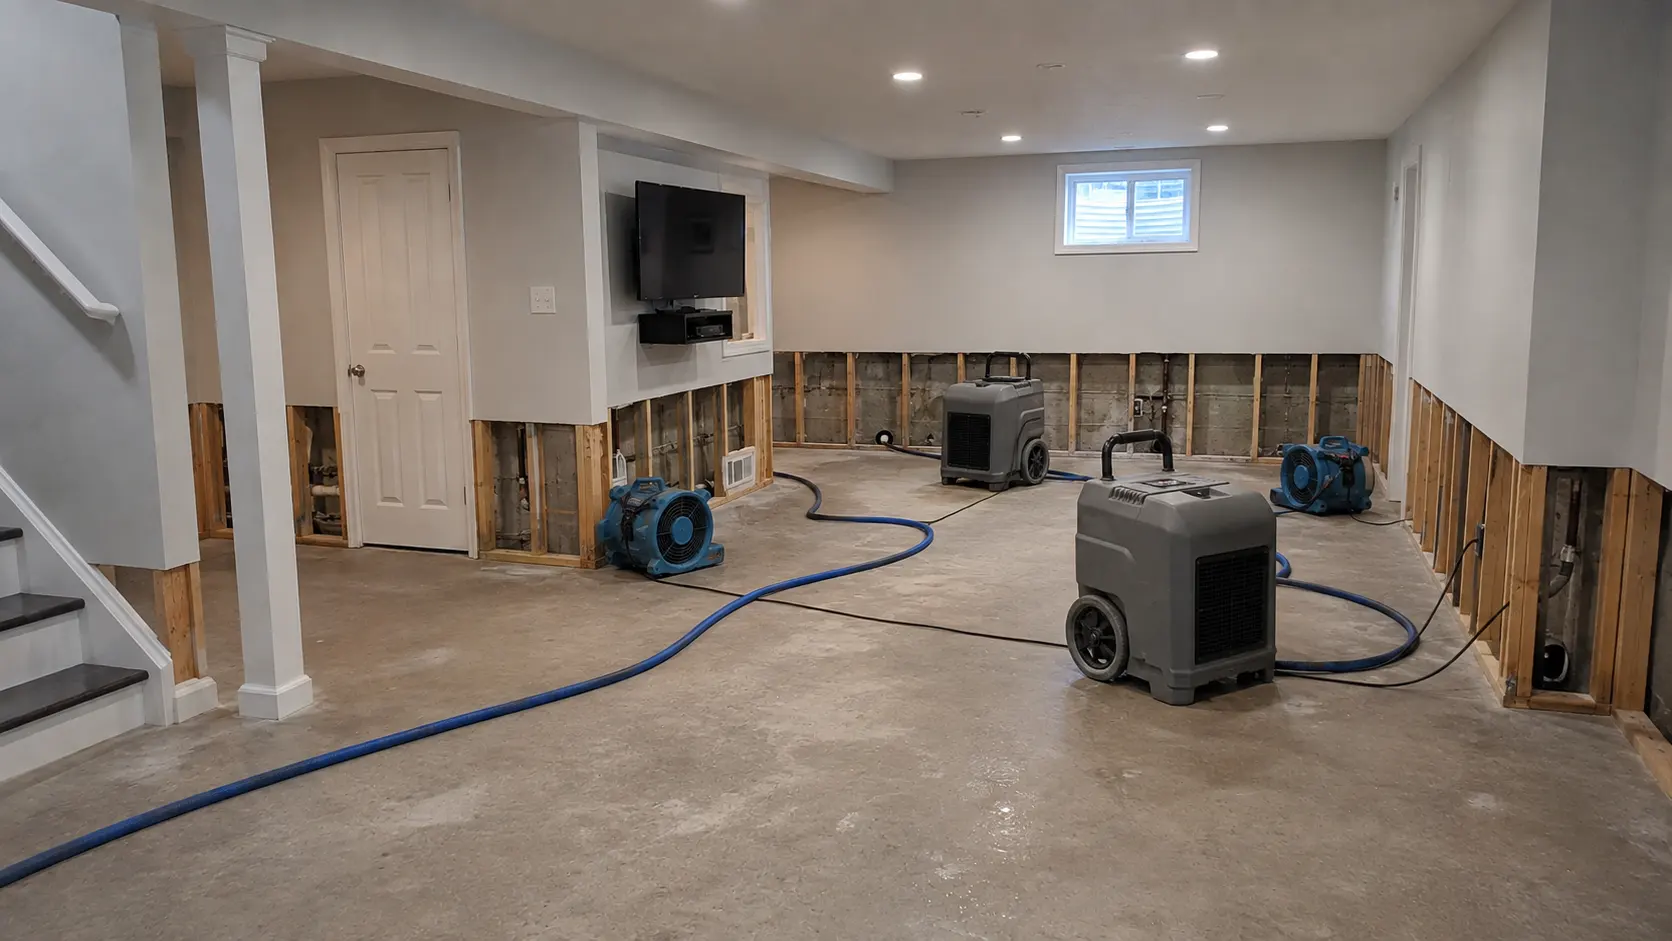
A flooded basement can damage flooring, insulation, drywall, trim, electrical components, furniture, and stored belongings. Even after the standing water is gone, moisture can remain inside walls and under finished surfaces. Proper cleanup and restoration after a flooded basement requires more than pumping out the water. The basement must be made safe, cleaned, dried, tested, repaired, and refinished.
Acting quickly can reduce the amount of material that must be removed. It can also limit odors, staining, mold growth, and long-term damage to the building. This guide explains the flooded basement cleanup process, including water extraction, structural drying, flood cuts, insulation removal, drywall replacement, finishing, and repainting.
Your first priority is safety. Do not enter a flooded basement if water may be in contact with electrical outlets, appliances, wiring, or the electrical panel. Avoid standing water that may contain sewage, fuel, chemicals, or other contaminants.
Before cleanup begins:
The correct cleanup method depends on where the water came from. A broken supply line presents different risks than a sewer backup or outside floodwater. Contaminated water generally requires more protective equipment, cleaning, disposal, and professional oversight.
Restoration should not begin until the water source has been stopped or controlled. Otherwise, new drywall, insulation, and flooring could be damaged again.
Common causes of basement flooding include:
A plumber, drainage contractor, foundation specialist, electrician, or other trade professional may need to correct the original problem. The repair should match the cause rather than simply cover the visible damage.
Take clear photographs and video before moving furniture or removing wet materials, provided the area is safe to enter. Record the water line, damaged walls, flooring, appliances, stored belongings, and the apparent source of the flooding.
Keep copies of estimates, invoices, moisture readings, drying logs, and disposal receipts. Ask the insurance company whether an adjuster must inspect the basement before demolition begins. Emergency work may still be necessary to prevent additional damage, but good documentation helps show what happened and why materials were removed.
The first physical cleanup step is removing standing water. Depending on the depth and size of the flooded area, professionals may use submersible pumps, truck-mounted extraction equipment, wet vacuums, or portable extractors.
Removing visible water is only the beginning. Water can soak into porous materials and travel behind walls, beneath flooring, into insulation, and through openings around pipes. A basement can look dry while still holding a large amount of hidden moisture.
If deep groundwater has surrounded the foundation, rapid pumping can create pressure differences that may affect the structure. A restoration professional or other qualified specialist should evaluate unusual or severe flooding before aggressive water removal begins.
Furniture, boxes, rugs, stored belongings, and loose materials should be moved out of the wet area. Salvageable items can be separated for cleaning and drying. Items that are contaminated, swollen, deteriorated, or unable to be fully cleaned may need to be discarded.
Porous building materials often hold water longer than they appear to. Depending on the water source and the length of exposure, removal may include:
Solid wood, concrete, masonry, metal, and some nonporous materials may be cleaned and dried if they remain structurally sound. The decision to save or remove a material should account for contamination, deterioration, access, replacement cost, and whether it can be dried completely.
Mud, sediment, sewage residue, and other debris must be physically removed before surfaces are disinfected. Disinfectants do not replace cleaning. Products must be appropriate for the surface and used according to their labels.
Workers may need gloves, eye protection, boots, protective clothing, and respiratory protection. Sewage backups and outdoor floodwater should be treated as contaminated. These conditions are not suitable for an unprotected do-it-yourself cleanup.
Never mix cleaning chemicals. Combining bleach with ammonia, acids, or certain household cleaners can release dangerous gases. Ventilation and product instructions matter during every cleaning step.
Professional structural drying typically uses commercial air movers and dehumidifiers. Air movers increase evaporation from damp materials. Dehumidifiers remove moisture from the air so the released water does not simply settle back into walls, framing, and belongings.
The equipment layout depends on the basement size, temperature, moisture load, and materials involved. Doors, cabinets, wall cavities, and enclosed areas may need to be opened so air can circulate. Drying equipment should remain in place until moisture readings show that the affected materials have returned to an acceptable dry condition.
Fans should not be used to spread air from areas contaminated by sewage or suspected mold into clean parts of the home. Professional containment and air filtration may be necessary when contamination is present.
A wall can feel dry on the surface while the bottom plate, insulation, or back of the drywall remains wet. Restoration technicians use moisture meters, thermal imaging cameras, hygrometers, and direct inspection to locate hidden damp areas and track the drying process.
Readings are normally compared with unaffected materials in another part of the building. This gives the technician a practical drying target for that particular home. Repairs should not close wall cavities until the framing and other materials are dry.
A flood cut is a horizontal removal of the lower section of drywall. It creates access to wet insulation and wall cavities while leaving unaffected drywall above the cut in place.
Many basement restoration projects use a cut approximately 24 inches above the floor because drywall panels and replacement strips can be planned efficiently. The actual height should be based on the water line, moisture readings, contamination, wall construction, and the condition of the drywall. The cut may need to extend above the visible damage so workers can remove wet insulation and reach clean, dry material.
A flood cut may be needed when:
Minor clean-water exposure may not always require a full flood cut if the wall assembly can be accessed and dried promptly. Moisture readings and material condition should guide the decision.
Before cutting drywall, workers should check for wiring, plumbing, and other concealed components. Trim and baseboards are removed first when necessary. The damaged drywall is then cut back to straight, sound edges that can support the replacement material.
Wet insulation must usually be removed because it traps moisture against the framing and reduces airflow inside the wall. Fiberglass batts can hold dirty water and debris. Cellulose insulation can settle and deteriorate after saturation. Foam products require evaluation based on their type, exposure, and condition.
Once the wall is open, the studs, bottom plates, masonry, fasteners, and back of the remaining wall materials can be inspected. Damaged wood, corrosion, visible contamination, and signs of previous leaks should be addressed before the wall is closed.
Mold can begin growing when damp materials remain wet. A musty odor, staining, visible growth, or repeated moisture readings may indicate a larger problem. Simply painting over mold or spraying the surface does not correct wet materials inside a wall.
Small areas on cleanable surfaces may sometimes be handled during ordinary restoration. Extensive growth, contaminated HVAC systems, repeated flooding, sewage exposure, or health concerns may require a qualified mold remediation contractor. The moisture source must be corrected, affected materials must be properly handled, and the area must be dried before reconstruction.
Flooding may also reveal termite damage, rotted framing, foundation cracks, corroded fasteners, or unsafe electrical components. These problems should be repaired by the appropriate professional before the finish work begins.
Reconstruction starts only after cleaning is complete and moisture levels are acceptable. The open wall cavities should be inspected before new insulation and drywall cover them.
Preparation may include:
Basement walls vary. Some are framed in front of concrete or block, while others use foam insulation, furring strips, or specialty wall systems. The rebuilt assembly should suit the existing structure and current local code requirements.
New drywall is cut to fit the removed sections and fastened to solid framing or approved backing. The panel thickness should match the existing wall so the finished surface remains flat. Any damaged corners, outlet openings, and wall penetrations should be repaired at the same time.
Moisture-resistant drywall can be useful in certain basement locations, but it is not waterproof and should not be installed over damp framing. No drywall product can compensate for an unresolved leak, drainage problem, or recurring flood condition.
Accurate fitting reduces gaps and makes the finishing work easier. Poorly supported seams, wide gaps, excessive fasteners, and uneven panel edges can lead to cracks or visible humps after painting.
The seams between the new and existing drywall must be taped and coated with joint compound. A typical repair receives several coats, with each coat spread wider than the previous one. This gradual buildup helps hide the seam and blend the repaired section into the original wall.
The finishing process generally includes:
Flood cuts create long horizontal seams that can remain visible if the compound is applied too narrowly. A wider, smooth finish usually produces a flatter-looking wall after primer and paint.
If the basement walls have orange peel, knockdown, sand texture, brush texture, or another finish, the repaired area must be matched before painting. Texture matching often requires a test area because spray pattern, material thickness, drying time, and application technique affect the final appearance.
Some homeowners use flood restoration as an opportunity to skim coat the walls and create a smooth finish. This can make sense when the existing texture is heavily damaged, inconsistent, or difficult to match.
New joint compound and exposed drywall paper should be primed before paint is applied. Primer reduces uneven absorption and helps prevent repaired areas from appearing dull or shiny compared with the surrounding wall.
Stains or lingering discoloration may require a compatible stain-blocking primer. The coating must be selected for the surface and the type of stain. Painting should begin only after the wall assembly is dry and the drywall finishing work has been inspected.
For the most uniform result, repainting the entire wall from corner to corner is usually better than touching up only the repaired strip. Existing paint may have faded or changed sheen over time, making a small touch-up easy to see.
Baseboards, trim, doors, and other finish materials are installed or repainted after the walls are complete. Flooring is normally coordinated so finished surfaces are not damaged by ongoing wall repairs.
The schedule depends on the amount and source of water, the materials affected, drying conditions, insurance inspections, and the extent of reconstruction. Water extraction and demolition may begin immediately. Structural drying can take several days or longer. Drywall installation, taping, coating, sanding, priming, painting, trim, and flooring add more time.
Rushing reconstruction can trap moisture inside the walls. A reliable schedule should be based on measured drying progress rather than the surface appearance alone.
A homeowner may be able to handle a very small, clean-water event when the electrical system is safe, the water source is stopped, and the affected materials can be removed and dried quickly. Even then, moisture may be hidden beneath flooring or inside insulated walls.
Professional help is the safer choice when:
Avoiding a few common mistakes can reduce the chance of recurring damage:
No repair can guarantee that a basement will never flood again, but maintenance can lower the risk. Check the sump pump and backup system, clean gutters, extend downspouts away from the foundation, correct poor grading, repair plumbing leaks, and inspect foundation cracks. Consider water alarms near water heaters, laundry equipment, sump pits, and other likely leak sources.
Store valuable belongings in water-resistant containers and keep them off the basement floor. If the basement has a history of flooding, choose finish materials and storage methods with future water exposure in mind.
After water mitigation and structural drying are complete, MrWalls Drywall & Painting can restore damaged basement walls and ceilings. Our services include flood-cut drywall replacement, drywall taping and finishing, skim coating, texture matching, plaster repair, priming, and interior painting.
Using one contractor for the drywall and painting stages helps keep the finish consistent from the repair through the final coat. MrWalls serves homeowners in Springfield, Chicopee, and communities throughout Western Massachusetts.
Call (413) 302-0640 or email [email protected] to discuss drywall restoration after a flooded basement.
Not always. The decision depends on the water source, exposure time, moisture readings, wall construction, and condition of the drywall. Soft, swollen, contaminated, crumbling, or delaminated drywall should be removed. Insulated wall cavities may need to be opened even when the surface damage looks limited.
Drywall and insulation can wick water higher than the visible line. Cutting above the affected area provides access to wet insulation, allows the wall cavity to be cleaned and dried, and creates a sound edge for the repair.
Leaving saturated insulation in a closed wall can slow drying and trap moisture against the framing. Wet insulation is often removed so the cavity can be cleaned, inspected, and dried properly.
New drywall should be installed after the water source has been corrected, contaminated materials have been removed, the cavity has been cleaned, and moisture readings confirm that the framing and surrounding materials are dry.
A properly supported drywall patch with wide, smooth finishing can blend into the existing wall. Matching the texture, priming the repair, and painting the entire wall from corner to corner provide the best chance of a uniform result.